Ah, the complicated world of van insulation. I made the grave mistake of skimping on my van insulation during the van build process (too preoccupied with cutting build costs). From extra noisy drives, freezing cold nights and blazing hot days, let me tell you why campervan insulation is so (unsexy) but SO important for a comfortable van living space!
I put together this post on insulation for van life conversions based on what I’ve learned from my own research and talking to van-dwelling friends. I want to help you understand what DIY campervan insulation options are available, and which will be best for your van. Let’s take a look!
Note: this post may contain Amazon Affiliate links to which I may make a small commission at NO extra cost to you.
Table of Contents
Do You Need to Insulate Your Van?
Technically, no. There’s no law that says insulating camper vans is necessary or that a van must meet certain insulation specifications. But if you want your van to feel like a cozy home that’s fully protected from the outdoor elements, van insulation is a must.
Biggest Reasons to Insulate Your Van
- Stay cool inside your van on hot days
- Stay warm inside your van on cold days
- Reduce road noise and outdoor noise
- Increase protection against rodents getting into your van
- Increase re-sale value of your van if you sell it someday
- Make it feel more like a home and less like a metal box
But there’s a LOT that goes into choosing van insulation. In fact, many vanlifers use a variety of insulation materials for different areas of their build. But before we dive headfirst into that, let’s go over the basics.
How Does Insulation Work?
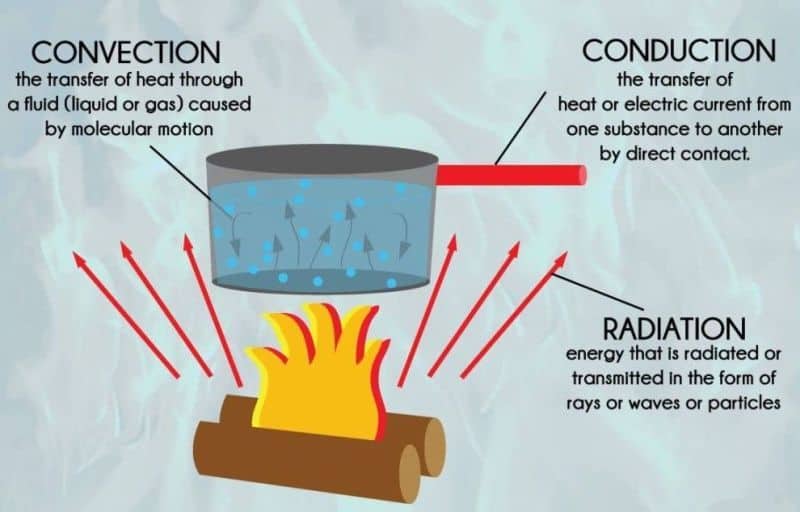
Insulation works by restricting and/or slowing the conductive and connective heat flow. Heat travels in three different ways:
- Radiant heat is waves or particles traveling at the speed of light (ie the sun’s rays)
- Convection heat is hot liquid or gas rising while cold liquid or gas drops (ie hot air above a fire)
- Conduction heat is created through electricity or heat directly transferring from one substance to another (ie the bottom of a pot heating up on a stove)
In warmer months or climates, heat from the outside is trying to work its way into every cool nook and cranny of your van. But the opposite is true in cold climates or weather; the cold air is trying to find any opening into your toasty warm van.
Insulation will help keep heat in when you want it, and heat out when you don’t want it. But different insulation products will provide different levels of protection based on their R-value.
What is R-Value?
The “R-Value” of your insulation refers to how well the insulation Resists heat flow traveling into, our out of, your van. R-Value is measured in BTUs (British Thermal Units) per hour. The higher the R-Value of your insulation, the better it prevents heat flow. R-value is determined by the type, thickness, and density of your insulation material.
R-value is measured on a scale from 1.5-7 (7 being the most heat-restrictive). R-value is also given “per inch”, so you need a certain number of inches of thickness in a van insulation material to achieve the advertised R-Value.
How Thick Does Van Insulation Need to Be?
Many vanlifers choose a van insulation thickness of around 3/4in – 1 inch. Ultimately, you can make it as thick or as thin as you want, but it all boils down to what your overall R-value ends up being.
That’s why insulation products with higher R-value are especially important for van builds; the higher the R-value per material layer, the less layers you’ll need, which will cut down on insulation thickness and save valuable van living space (assuming you install correctly and avoid thermal bridging…which leads us to…)
What is Thermal Bridging?
Thermal bridging is when the overall R-value of your van wall is lower than the R-value of your insulation. This happens when you (accidentally) create a path of least resistance for heat from the outside to works its way into the interior of your van (or vice versa). Thermal bridging is not a good thing because it renders your insulation useless (or at least a lot less effective).
For example, a common mistake when insulating your van is not insulating the interior van ribs. Sure you may have amazing R-value on the surrounding walls, but exterior heat will travel right to your van’s metal ribs and work its way right in. Same goes for insulating around your wheel wells–if you don’t insulate those, cold or warm air is on the other side just waiting to work its way in.
What is a Vapor Barrier?
A vapor barrier is essentially a sheet of plastic usually used in stationary homes to prevent moisture from molding your insulation or wall materials. There’s a lot of debate on whether or not you need a vapor barrier for your van insulation, but my opinion is that you don’t.
Your van’s metal walls are already their own impenetrable vapor barrier, and if you properly seal ANY and ALL air gaps between your walls and insulation, there’s no need for a vapor barrier. In fact, you may INCREASE your chance of rust or mold by using a vapor barrier if it’s installed with any air gaps.
Your best bet is using breathable insulation and wall build materials in order to increase air flow and allow moisture to escape AND making sure you’ve properly sealed all potential insulation air pockets.
Features of High-Quality Van Insulation
Before we dive into the different types of insulation, let’s review the most important features of high-quality insulation. Depending on your van build, budget and personal preference, some features will be more important to you than others.
High R-Value
The higher the R-value of your insulation material, the better job it will do at restricting heat flow and insulating your van interior.
It’s important to remember that insulation is all about preventing the transfer of heat. It’s not just about “trapping” heat inside your van in cold weather—it can also mean preventing heat from coming in when it’s hot outside. That means that a high R-Value is important both for keeping your van warm in winter and for keeping it cool in summer.
Non-toxic
You want your van insulation to be non-toxic and minimally off-gassing. That means it shouldn’t leech too many chemicals into the interior of your van (it’s a small space, after all!) and should emit no or very little chemical smell or VOCs (Volatile Organic Compounds). Some types of insulation will emit some smell no matter what, but this will usually go away with time.
If non-toxicity is very important to you, you might want to opt for an all-natural insulation solution like wool, rather than foam or spray insulation.
Durable
Whether it’s all-natural or synthetic, your insulation should be built to last. Rigid foam is one of the most durable types of insulation, usually rated to last up to 50 years. If durability is important to you, opt for rigid foam or spray foam over wool or fiberglass.
If you do a lot of driving, your insulation is going to have to withstand the vibrations and bumps or the road. In that case, either a very durable insulation material OR loose-fill / batts can work, since loose-fill can “go with the flow” of the vibrations.
Moisture Nonabsorbent
This is something people don’t often consider when choosing an insulation material, but your insulation should not be prone to growing mold or mildew. This can mean either that the material is impervious to moisture (like rigid foam or spray foam) or that it has moisture control properties (like 3M Thinsulate insulation) or natural moisture resistance (like Havelock wool.)
This is more important to consider if you live in a cold or damp climate. If you van life primarily in the desert, mold may not be such a concern.
Reasonably Priced
Obviously, any insulation you choose will need to fit your budget. This might be the ultimate decision-maker for you. For example, spray foam has a higher R-Value than sheep’s wool, but it is also double the cost to achieve the thickness you need for that R-Value.
Polyiso has a very high R-Value and is pretty reasonably priced…however, you might decide that a natural material with a higher cost is better for you because you can afford it and you want a non-toxic, eco-friendly solution.
Sound-deadening
Do not underestimate the importance of sound-deadening insulation! I did and I have paid the price dearly. Imagine barely being able to hear your radio at full-blast every time you’re driving on a highway. Even trying to chat with a passenger requires near-yelling in my van…eek! Sound-deadening floor insulation is not just for occasionally noisy days in a city–I consider it an everyday necessity.
Certain insulation materials are better for sound-deadening than others. Wool-based insulations are great for absorbing noise in van walls, but don’t make for good van floor insulation (you’d have the fluffiest, coziest floor though!).
Popular Types of Van Conversion Insulation
Now that we know what to look for in a van build insulation material, let’s take a look at three of the most popular insulation for van conversions.
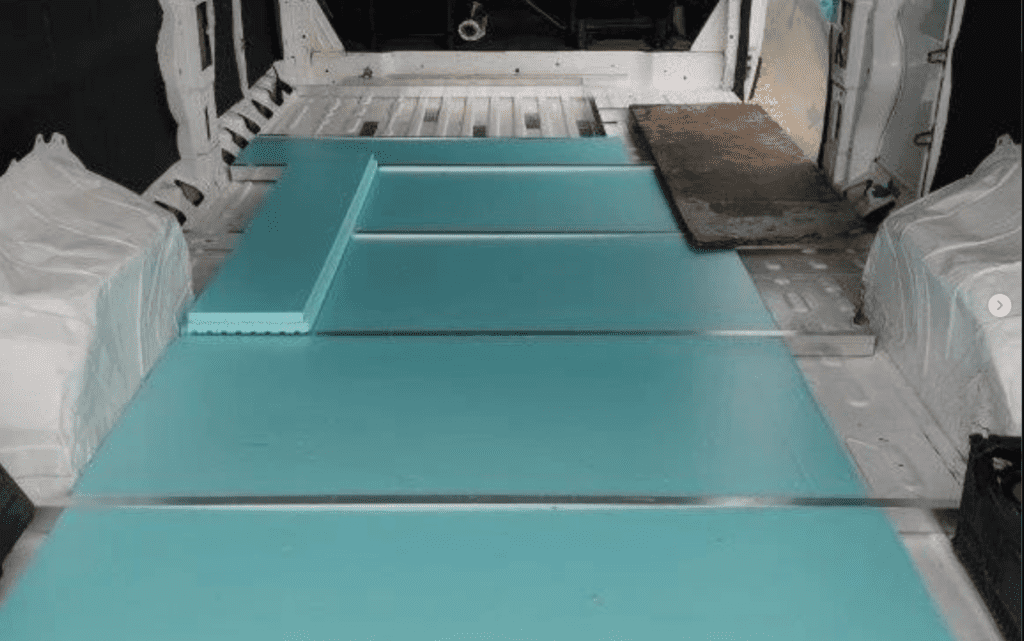
Types of Rigid Foam Insulation
Now that we know what to look for in a van build insulation material, let’s take a look at three of the most popular insulation for van conversions.
Polyisocyanurate (Polyiso) Foam Board
R-value per inch: 6.5
Price range: $0.042 – $0.70/square foot
Polyisocyanurate (or Polyiso) is not only one of the most popular rigid foam options, but overall popular choice among vanlifers. With one of the highest R-values of 6.5 per inch and an affordable price tag, this is a great option for covering the big areas of your van.
But polyiso is a stiffer material, making it a little difficult to work with. Use it in conjunction with a more flexible insulation (such as open-cell spray foam) to set yourself up for a top-notch insulation job.
Extruded Polystyrene (XPS) Foam Board
R-value per inch: 4.7
Price range: $0.60 – $1.50/square foot
XPS is a solid bang for your buck–its biggest drawback is its use of HFCs, which are very harmful greenhouse gases. But XPS has a decently high R-value, is relatively inexpensive, easy to cut and maneuver, and is impressively resistant to being under compression. This makes it a great option as van floor insulation as well.
Expanded Polystyrene (EPS) Foam Board
R-value per inch: 3.9
Price range: $0.10 – $0.30/square foot
I’m adding this to the list to be “technically” thorough, but EPS is essentially the styrofoam you find in big box packages. While EPS foam is inexpensive, lightweight, easy to cut and shape, and boasts a decent R-value, its biggest pitfall is that it cannot hold up to vibrations–like, seriously cannot hold up. This means that it would essentially disintegrate behind your van’s walls with every road bump and rock you drove over.
I think the only use for EPS as van insulation is for short-term stints for small areas. Maybe you have a window leak or small van crack that needs covering just until you can properly fix it.
Types of Spray Foam Insulation
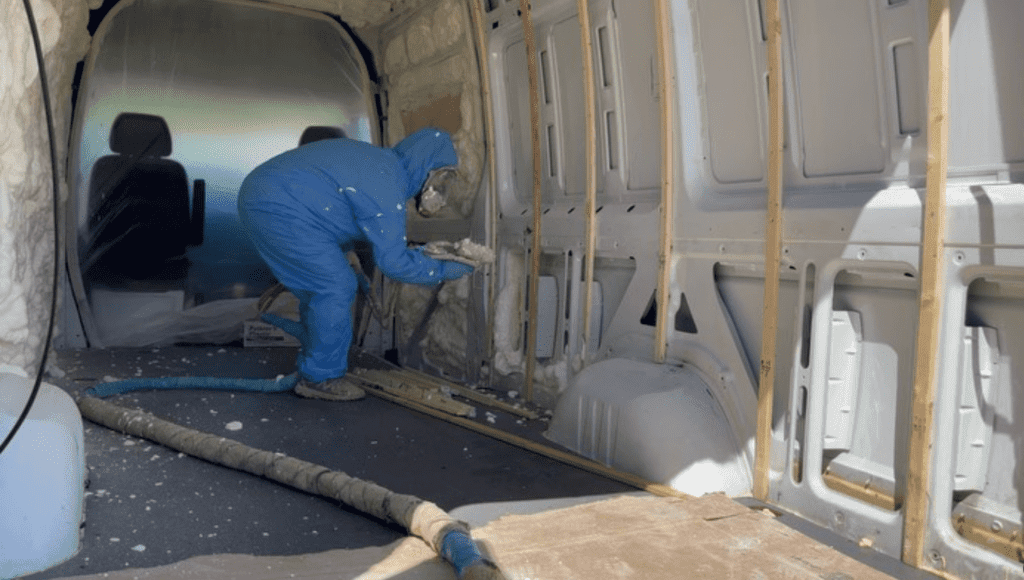
There are a couple different types of spray foam to consider as your van insulation: open-cell spray foam and closed-cell spray foam–the difference lies in the structure of their cells. But overall, spray foam has some of the highest R-Value of any type of insulation and when installed correctly, creates a sealed barrier that is impenetrable to moisture. It also provides sound dampening.
Open-Cell Spray Foam Insulation
R-value per inch: 3.6
Price range: $1.00 – $1.20/square foot
Open-cell spray foam is “softer” and more flexible than closed-cell because tiny air gaps create space between the cells. This is more commonly used as van insulation because it’s more malleable and easy to get into nooks and crannies. But, it has a lower R-value than closed-cell spray foam and is more susceptible to mold and mildew.
Open-cell spray foam makes for a great sound barrier and is very lightweight. But it’s also more likely to shrink or get worn-down over time compared to closed-cell. It also doesn’t perform very well under extreme temperatures.
Closed-Cell Spray Foam Insulation
R-value per inch: 7
Price range: $1.25 – $1.50/square foot
Closed-cell spray foam is denser, physically heavier, and more rigid than open-cell spray foam. In fact it’s so dense, it helps reinforce your rig’s structure. However, when it comes to insulating a vehicle that’s going to be moving and shifting around constantly, stiff material isn’t necessarily ideal.
But with the highest R-value of 7 and its ability to create an airtight seal making it extremely moisture-resistant, closed-cell spray foam boasts some impressive feats. You’ll pay the price for those feats, given it’s on the more expensive side of van insulation materials.
Closed-cell spray foam will be more durable in the long-run than open-cell spray foam. Closed-cell is ideal for covering large, fairly “flat” areas of your van walls (then using open-cell for the smaller, harder-to-reach areas). Closed-cell foam isn’t as sound-deadening or shock-absorbant as open-cell.
Here’s a more in-depth comparison of closed vs open-cell spray foam if you’re interested!
Hydro Fluoro Olefin (HFO) Spray Foam Insulation
R-value per inch: 6.3 per inch (with 2-in layer)
Price range: $1.00 – $4.50/square foot
HFO is the next eco-friendly generation of insulation. It was introduced in the late 2010’s but has been slow to adopt–even though it outperforms traditional closed-cell spray foam and is far less damaging to the atmosphere. You might struggle to find it on the market.
Instead of using harmful blowing agents in spray foams such as hydrofluorocarbons (HFCs), manufacturers are switching to HFOs because of its low global warming potential and its zero ozone depletion potential. In fact, as of January 1st 2021, Colorado banned the continued use of HFCs in spray foam and is requiring the transition to HFOs.
What makes HFO-spray foam so interesting to me is that its R-value drastically increases the more you build up layers, thanks to its non-linear thermal properties. So a 2-inch thick layer of HFO foam has an R-value of 6.3 per inch, but an 8-inch layer has an R-value per inch of 7.4.
Builders who have used HFO-based spray foam say it’s easier to handle than traditional spray foams, less “sticky” (making it easier to clean their spray guns) and less chemical-y smelling.
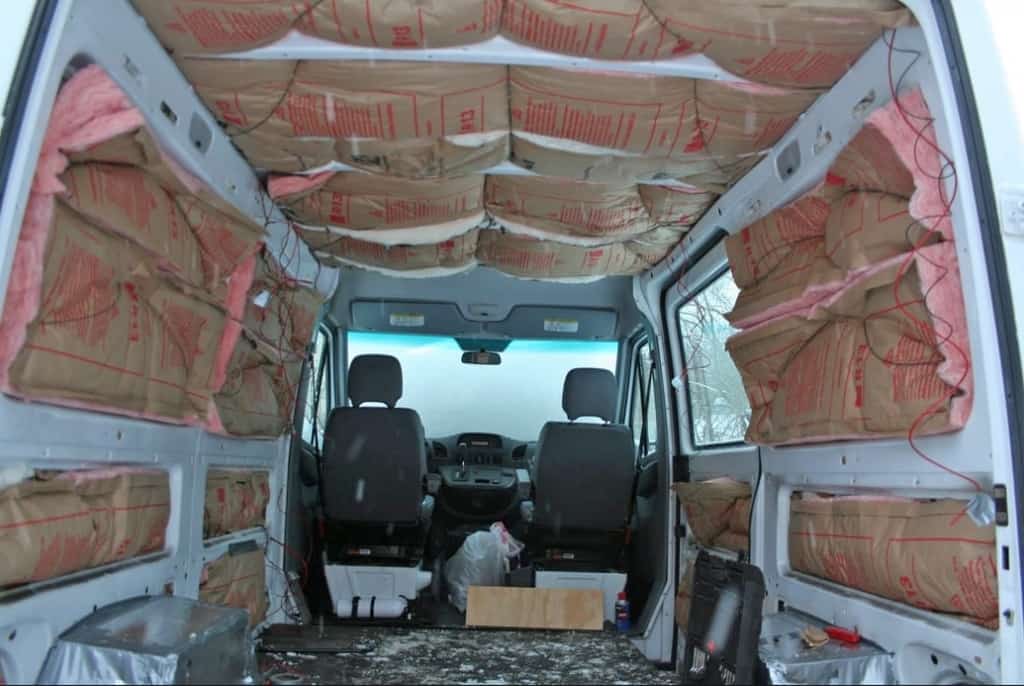
Havelock Wool Insulation
R-value per inch: 3.6 for batts and 4.3 for blow-in
Price range: $1.25 – $1.50/square foot

Havelock wool is all-natural, non-toxic, environmentally-friendly and naturally moisture-resistant. It is cheaper than spray foam but more expensive than rigid foam (about on par with fiberglass and rock wool.) It has a reasonably high R-Value but certainly not the highest.
You will need a thicker installation of sheep’s wool to achieve the same R-Value as rigid foam, so keep in mind that this will take away from the available space inside your van. On the plus side, the wool will wick moisture away from metal surfaces and does a decent job muffling noise. Some vanlifers report a “sheepy” smell when first installing, but this should dissipate over time.
Use this Havelock wool calculator to figure out how much you’ll need and what it’ll cost!
Fiberglass Insulation
R-value per inch: 4.3 for batts and 2.5 for blow-in
Price range: $0.88 – $1.64/square foot
Fiberglass is made of tiny bits of glass and plastic polymers, which are naturally fire-retardant and resistant to absorbing moisture. But fiberglass is dangerous to breath in, makes the skin itchy on direct contact, and uses a harmful pollutant called styrene (used in gels and resins) during production.
While fiberglass has a decent R-value and is pretty inexpensive, it’s high-maintenance to install because of its harmful materials. You also have to be extremely careful to properly seal off fiberglass in your walls, or you risk constantly breathing in toxic air particles.
Fiberglass is a great insulation option for stationary homes, but I don’t recommend it at all for campervans. Mainly because it’s very thick so it takes up valuable van space, the vibrations of a moving rig can increase chances of fiberglass particles floating around, and fiberglass can sag and become less effective if it gets wet–which also increases chance of mold.
Reflectix Radiant Barrier
R-value per inch: 4.5
Price range: $1.25 – $1.50/square foot
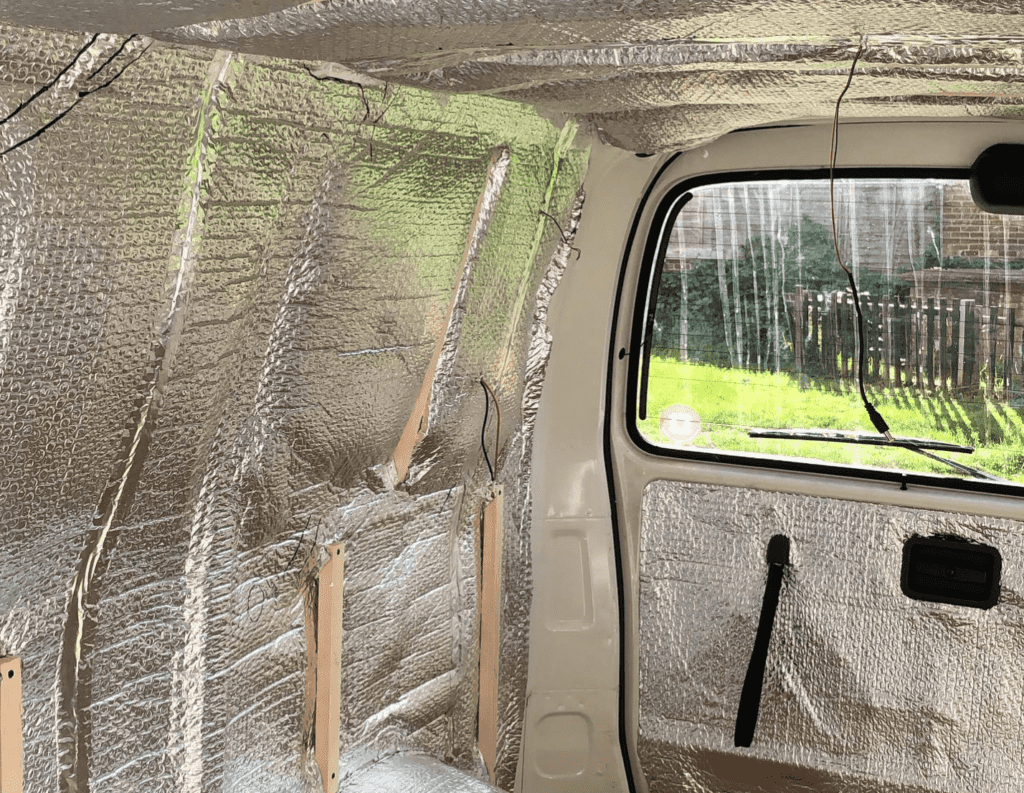
I think of reflectix as space bubble wrap. It’s airy, lightweight, super cheap, reflective and extremely easy to cut and shape. But it’s only ideal to use as a radiant barrier; used to block out radiant heat from the sun’s rays–NOT as van wall insulation.
So, the best way to use reflectix is as window covers in your van. IF you use it as wall insulation pressed up against your van’s metal wall, there MUST be an air gap between the reflectix and the remaining of your wall. Otherwise, the radiant heat passes right through the reflectix and it’s totally useless. You’d be better off doing a spray foam insulation.
My Recommended Campervan Conversion Insulation Setup
So what’s the best insulation option for you? My recommendation is to use a variety of insulation materials on different areas of your van build, to maximize your R-value and keep money in your pocket.
Van Floor Insulation: I recommend XPS foam because it’s pretty cheap, has a strong R-value and its compression strength is unbeatable. And since it’s one of the more “toxic” insulation materials, it’s better to have it down by your feet than up by your head!
Van Wall Insulation: A combination of either Polyiso or XPS foam on the big, flat areas of your van walls and then using an open or closed-cell spray foam to fill in the nooks and crannies. While closed-cell spray foam has an impressive R-value of 7, it isn’t as shock-aborbant or noise-deadening as open-cell spray foam. So, depending on the area of your van, you may want to use both types of spray foam.
Van Door Insulation: I recommend using either havelock wool or spray foam insulation for your van doors. Since doors are smaller areas with awkward small areas, flexible-based materials such as wool and spray foam can more easily create an airtight seal and naturally “flow” with the movement of the door.
Van Windows: This is where reflectix insulation shines (and just about the only place). Keep the silver side of reflectix faced to the outside of your van, towards the outside, on hot sunny days to repel heat. Keep the silver side faced inside your van on cold days, when you want to trap the heat inside your rig.
When to Consider Not Insulating Your Van
If you are based in the southern US and plan on permanently being in that region for your duration of van life, you may not need van insulation. Hear me out…
Yes insulation prevents heat from entering your van on hot days, but it can only do so much. If you aren’t actively running an AC all day or relocating to shady, cool spots, then your van’s interior is going to match the outside air temperature by the end of the day, regardless of how great your insulation is. Insulation can only do so much with a hot, hot sun beating down on it all day!
And I have lived long enough in my van to know that you RARELY want to shift your van throughout the day to chase shade or cooler areas. Packing up the van for driving is a process. So yes, it’s unlikely you will want to skip insulation, but I think this is the one scenario that would allow for it!
Summing It Up
Choosing the right insulation for your van is a critical step in your campervan buildout. It’s worth investing the time and the money to make sure you get it right. That being said, you don’t have to spend thousands of dollars to get a well-insulated van. As long as you understand the caveats and know what tradeoffs you’re willing to make, you can find a great insulation solution that fits your budget and lifestyle.
Save This on Pinterest